
When an Old Photo Is Too Damaged to Restore: How Studios Set Honest Expectations
A photograph may be the only surviving image of a grandparent, a wedding day, or a childhood home. When it is torn, stained, faded, or partly missing, it is natural to ask whether anything can be done. When an Old Photo Is Too Damaged to Restore: How Studios Set Honest Expectations is a useful question because restoration is not simply a matter of removing every visible flaw. It is a careful process of distinguishing recoverable information from details that are no longer present.
A responsible studio should explain what it sees, what it can reasonably attempt, and where interpretation may be required. That conversation matters as much as technical skill. This guide describes common damage, how an assessment works, why some results involve uncertainty, and how to make a decision without risking an irreplaceable original. The principles apply whether you are reviewing one family portrait or organizing a box of photographs in Chicago, Illinois. The aim is clarity—not a promise that every photograph can return to its original condition.
What “too damaged to restore” actually means
Damage can be serious without making every improvement impossible
In everyday conversation, “restore” can sound like returning a photograph to exactly how it looked when it was first made. In practice, restoration usually means improving the visible image while preserving the photograph’s character. A digital editor may reduce stains, repair a tear, balance contrast, or rebuild a small area using clues from the remaining image. The original image information, however, may be incomplete or absent.
That difference explains why a photograph can be suitable for some work but not a complete reconstruction. A damaged edge may be repaired more confidently than a face covered by a large stain. Fading may respond to careful tonal adjustment, while a missing section cannot be recovered from the paper itself. The studio can sometimes create a plausible visual continuation, but it should identify that work as interpretation rather than recovered fact.
Restoration has technical and personal limits
Technical limits concern what can be observed in the source: image detail, focus, contrast, and the amount of surviving material. Personal limits concern what the family considers acceptable. One person may prefer a clean, polished result; another may want visible signs of age retained. Neither preference is automatically right. The goal is to agree on the purpose and appearance before extensive editing begins.
- Recoverable information: details that remain visible in the print or a good scan.
- Partly obscured information: areas that may be clarified, but still require cautious judgment.
- Missing information: areas with no reliable visual reference, where reconstruction becomes interpretive.
This distinction is central to honest expectations. A studio should not present a guessed feature as a verified detail, even when the reconstruction looks convincing.
How a studio assesses a severely damaged photograph
First comes the source, not the software
An assessment starts by understanding what is being submitted. Is it the original print, a scan, a phone photograph of the print, or a copy made years ago? Each source contains different information. A sharp, evenly lit scan may reveal texture and tone that are hard to see in a casual snapshot. By contrast, glare, shadows, low resolution, or a camera angle can hide details and make damage seem worse—or make the image unsuitable for precise evaluation.
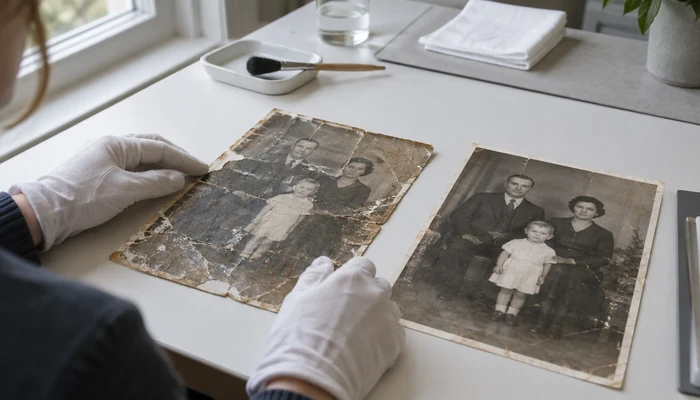
When possible, keep the original safe and send a high-quality digital capture for an initial review. Do not press, flatten, clean, or wet a fragile print to improve its appearance. A conservator may be needed if the object itself is brittle, stuck to glass, moldy, or actively deteriorating. Digital retouching and physical conservation are different kinds of work.
For practical capture guidance, see this guide to photographing old photos for editing. It can help you make a clearer reference image, although it does not replace a studio’s assessment of a delicate original.
Then the studio maps damage and surviving detail
A careful review considers the image as a whole and records the areas that need attention. The studio may look at whether faces are still recognizable, whether important shapes continue across a tear, and whether another print or scan exists. It may also ask what the family knows about the people, clothing, setting, or event. Context can guide an edit, but it should not be confused with visual proof.
- Identify tears, creases, stains, fading, scratches, water marks, and missing sections.
- Check whether key subjects remain visible in the damaged areas.
- Ask whether relatives have another copy or related photographs from the same event.
- Clarify the desired level of cleanup and whether interpretive reconstruction is acceptable.
These steps can make the conversation more specific. Instead of saying that an image is simply “bad,” the studio can explain which parts are likely to improve and which remain uncertain.
A preview or staged estimate can reduce surprises
For complex cases, a studio may recommend an initial test edit or a limited preview before undertaking extensive work. The preview can show the general direction: for example, whether contrast can be balanced or a small tear can be blended. It cannot always predict the final result, especially when a large area is missing. Ask what the preview includes and whether it is a finished deliverable or an assessment aid.
A written estimate should define the proposed scope, likely limitations, revision terms, and any additional work that would require approval. This is particularly useful when several family members have different ideas about how the portrait should look.
Damage types and what they may allow
Fading, discoloration, and low contrast
Fading often reduces separation between tones, making faces, clothing, and background details look flat. A careful edit may improve contrast and make remaining tonal information easier to see. However, when a light area has lost nearly all visible detail, increasing contrast may also reveal grain, stains, or uneven paper texture. A brighter image is not necessarily a more accurate one.
Color shifts may be corrected to a degree, but an old print does not always preserve enough information to determine its original colors. A studio can use visual references and a restrained approach. If the original color is unknown, a proposed colorization should be described as an artistic interpretation, not a factual recovery.
Tears, creases, scratches, and abrasion
A fine scratch across a plain wall may be relatively straightforward to reduce. A deep crease crossing an eye, patterned fabric, or a group of faces is more difficult because it interrupts important detail. The editor must infer how the area might continue, and the result can vary in confidence. The same principle applies to missing corners: the background may be reconstructed simply, while a missing hand or facial feature has much higher stakes.
Read about how scratch repair is approached in damaged images for a closer look at why the location and depth of a mark matter.
Water, mold, sticking, and missing image areas
Water can cause stains, swelling, ink movement, and separation between layers. Mold may damage both the print and the image surface. If a photograph is stuck to glass, peeling it away can tear off the emulsion. In these situations, avoid home remedies such as soaking, rubbing, or applying household cleaners. The safest first step may be to stop handling the original and seek advice about physical conservation.
Digital tools can sometimes soften the appearance of damage in a scan, but they cannot restore information that never survived. A large missing area may be filled with an unobtrusive tone, reconstructed from another photograph, or left visible. The best option depends on the intended use and the family’s preferences.
How studios communicate uncertainty and set a fair scope
Separate visible evidence from interpretation
When an Old Photo Is Too Damaged to Restore: How Studios Set Honest Expectations depends on clear language. A trustworthy explanation separates what can be seen from what would need to be invented. For example: “The face is visible, but one eye is covered by a missing section. We can reduce the surrounding damage, but recreating the eye would be interpretive.” That is more useful than a broad promise to make the image look new.
Ask the studio to identify uncertainty by area rather than giving a vague overall confidence rating. A photo can have a straightforward background repair and a highly uncertain face repair in the same file. This area-by-area explanation supports a more informed decision.
Agree on the goal before editing begins
Families may want different outcomes: a faithful archival copy, a print suitable for framing, a cleaned-up image for a memorial, or a version that retains visible age. The work should match that purpose. Restoring every mark may remove evidence of the photograph’s history; leaving every flaw may not suit the intended display. A brief discussion can prevent the editor from solving the wrong problem.
Before approving work, consider asking:
- Which changes are corrections, and which parts require reconstruction?
- Can the studio preserve a version with minimal edits as well as a more restored version?
- Will the original scan and the final file be delivered separately?
- How are revisions handled if the result does not match the agreed direction?
- What file size and format will be suitable for printing or sharing?
Expectations should include what will not be changed
Good restoration is not always dramatic. A studio may recommend leaving a feature alone rather than inventing detail, or retaining a small crease because removing it would distort a face. This kind of restraint is part of the service, not a failure to edit. Similarly, a retouched portrait should not be expected to repair every issue in a new photograph. Lighting, focus, expression, and composition are best addressed when the picture is made; not everything can be fixed in editing.
Choosing between restoration options
Minimal cleanup, detailed retouching, or reconstruction
Restoration is not one fixed treatment. A minimal edit may correct overall tone and remove a few distractions while preserving age marks. Detailed retouching can address more scratches, tears, and uneven areas. Reconstruction may add visual information where the original is missing, which makes it the most interpretive option. Each level should be explained before the work starts.
| Option | Typical aim | Important limit | Useful question |
|---|---|---|---|
| Basic digital cleanup | Improve tone and reduce minor distractions | Does not replace missing image detail | What changes are included? |
| Detailed retouching | Repair multiple visible marks and local damage | Complex patterns or faces may remain uncertain | Which areas can be repaired confidently? |
| Interpretive reconstruction | Create a more complete-looking image | Some details are inferred rather than recovered | Can uncertain areas be identified or kept subtle? |
| Physical conservation referral | Stabilize a fragile or deteriorating print | It is different from digital image editing | Should I stop handling the original? |
If a photograph is precious or unique, consider preserving an untouched scan before approving any edits. You can also discuss ways to keep old photographs in a digital format so the family has a reference copy.
Preparing a damaged photograph for a studio review
Protect the original before making a digital copy
Wash and dry your hands before handling a print, and hold it by the edges when it is stable enough to move. Do not use tape, glue, pens, sprays, or cleaning products on the photograph. If it is brittle, flaking, damp, moldy, or adhered to another surface, avoid scanning it yourself if that would require pressure or movement.
For a stable print, a flatbed scanner is often a practical option. Use a high-resolution setting and save an unaltered master file. If you use a camera or phone, keep the camera parallel to the print, use even light, and avoid reflections. Do not apply filters or automatic “beauty” corrections to the only copy you send for assessment.
Share useful context without directing the editor to guess
Provide information that helps identify the image, but make clear what is known and what is uncertain. A relative’s name, approximate date, location, or another photograph from the same occasion can help. If you have a second copy, include it as a separate reference instead of combining the files into a composite yourself.
- Send the clearest available scan or photograph of the print.
- Describe the damage and identify any areas that matter most to your family.
- Explain whether you prefer a natural, lightly cleaned appearance or a more complete reconstruction.
- Disclose if colors, clothing, or facial features are based on family recollection rather than another image.
- Keep the original stored safely while digital work is being discussed.
Choose a studio by process, not only by a polished sample
A dramatic before-and-after example can be impressive, but it may not show how the studio handles uncertainty. Ask to see examples involving comparable damage, and ask what was reconstructed. Review the studio’s communication, file delivery terms, and willingness to discuss limits. Each family has different tastes and expectations, so a portfolio should help you decide whether the approach feels appropriate—not prove that every damaged image will receive the same outcome.
For broader context on the craft and judgment involved, explore this overview of the care and precision of photo restoration.
Costs, timing, and what an estimate can tell you
Why damage level changes the amount of work
The time needed depends on the condition of the source, the size of the damaged areas, the amount of detail involved, and the desired finish. Removing a few small marks from a clear scan is different from rebuilding a torn portrait with missing facial information. A studio may need to inspect the file before offering a firm estimate, and that is reasonable when the condition cannot be judged from a short description.
Do not compare estimates by price alone. Check that the proposed scope is similar: one quote may include basic tonal correction, while another includes extensive retouching and revisions. Ask whether scanning, test edits, print preparation, or alternate versions are included. If a studio cannot yet predict the final result, it should explain what it can estimate and what may change after review.
Questions to ask before approving a project
- What is the main goal of the restoration?
- Which visible areas are likely to improve, and which are uncertain?
- Will any missing details be reconstructed?
- Can I approve a preview before detailed work proceeds?
- What will I receive, and will the untouched source remain available?
- How will the studio handle changes in scope or additional revisions?
There is no universal result that suits every family. A studio should listen to your priorities, describe trade-offs in plain language, and avoid treating an estimate as a guarantee of perfect recovery.
Frequently asked questions about severely damaged photos
Can every old photograph be restored?
No. Many photographs can be improved, but complete restoration is not always possible. If image information has faded away or a large area is missing, the editor may be unable to recover the original details. A studio can explain whether limited cleanup, reconstruction, or preserving the image as it is makes the most sense.
Can a studio recreate a missing face?
A studio may be able to create an interpretation, particularly if another photograph of the person exists. Without a reliable reference, a recreated face is not recovered evidence. Ask the editor to explain the source of any added detail and whether it can be kept subtle or shown as a separate version.
Should I repair a torn photo at home before sending it?
Usually not. Tape, glue, water, and pressure can cause additional damage or make later conservation harder. If the print is fragile, stuck, wet, or moldy, stop handling it and ask about safe next steps. For a stable print, provide a clear digital capture instead of physically repairing it first.
Will a higher-resolution scan fix missing details?
A high-quality scan can capture more of the detail that still exists, which can help with editing. It cannot recreate information that has disappeared from the print. A better scan is useful evidence, not a way to reverse every kind of damage.
Is colorization the same as restoration?
Not necessarily. Colorization adds color based on references or informed artistic choices, while restoration may focus on preserving or improving information already present. When original colors are unknown, the result should be described as an interpretation. You can ask for a neutral black-and-white restoration as well.
How can I tell whether the result is faithful?
Compare the final image with the untouched scan, and ask which areas were reconstructed. Keep both versions and any notes about the edit. If the photo has historical or family significance, a restrained version may be more appropriate than a heavily altered one.
Can a digital file stop the original from deteriorating?
A digital copy preserves a visual record, but it does not stabilize the physical print. Store the original in a cool, dry place away from direct sunlight and avoid unnecessary handling. Keep more than one digital backup in separate locations when possible.
A practical way to decide what happens next
When an Old Photo Is Too Damaged to Restore: How Studios Set Honest Expectations is ultimately a question of evidence, purpose, and trust. A clear assessment should identify what survives, describe what is uncertain, and explain whether the proposed work involves correction or interpretation. You do not need to choose the most extensive edit. A modest improvement—or preserving the image unchanged—may be the best decision for your family.
Before you proceed, make a safe digital copy if the print is stable, write down what matters most, and ask for a specific explanation of the likely limits. Review the studio’s portfolio and communication style before deciding. For a photo that may benefit from a professional review, you can explore photo restoration options and discuss the condition of the image before committing to a scope.
About Video Studio Jimenez
Video Studio Jimenez brings professional photography experience to weddings, maternity, newborn, studio portraits, photo restoration, and passport photography. Video Studio Jimenez accompanies couples and families in Chicago, Illinois and surrounding areas. Each photograph and each family’s expectations are different, so reviewing the portfolio, discussing the desired style, and understanding what editing can and cannot change are important steps before choosing a service.
Professional Photographer Chicago, Restauración fotográfica Chicago il, photo restoration, photo repair services Deerfield, restore old photos Edison Park, Photo Restoration Mount Prospect, digital photo restoration Bensenville, old photo restoration Norridge, Restauración fotográfica North Center, professional photo restoration Hinsdale